by WebKeyDesign | Jul 20, 2026 | Apple, Mac OS X, Microsoft, Networking, Tech Notes, Windows
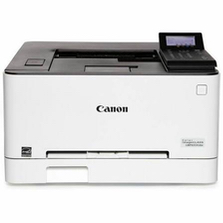 There is nothing more frustrating about the tech world than having to support printing. Unlike computers, tablets, and mobile phones, the printer seems to be the last reminder that the world is not entirely digital. The printer is in fact a mechanical device that requires attention to detail. It is the one device that I can think of that I use the least but which breaks down just when I need to use it. It will break because I use it too much or not enough! The printer has spinning rollers and ink cartridges and it moves paper, but if the paper is too moist or not enough, or wrinkled, or folded, or too thick then you have a paper jam. What I am trying to say is that your printer is needy, it wants your attention or else.
I decided to replace my Lexmark printer, because all it really did at this point is swallow paper and refuse to print. The replacement ended up being a Canon color laser printer that I found on sale on Amazon. This time, I went with a color laser and decided to give Canon a shot at being the home office printer. First you should know that all printer software is terrible. I install printer drivers for Lexmark, HP, Epson, and Brother and it is all equally confusing on Windows and MacOS. The main difference between the Canon and the Lexmark printers is the noise. The Lexmark is rather quiet when it spins up every now and then. The Canon sounds rather loud and you can hear it from another room when it wakes up and prints. I did run into two issues with the Canon. The first issue was that I was unable to update the firmware on the printer, the other was my fault. I forgot what code I setup for the security of the printer and needed to reset it back to factory settings.
Factory Reset
For the reset, you must be at the printer and use a special sequence to put the printer into Service Mode. This is not at all in the manual. For Service Mode:
- Press Home
- Press 2
- Press 8
- Press Home
Now you can do a Factory Reset from the menu options.
Firmware Update
For the Firmware Update, you will need to download it from the Canon Support site or you can update the firmware from one of the options on the printer itself, by going through the menu options. I preferred to download the update from the site, connected a laptop to the printer via USB, and then ran the firmware update tool as administrator in Windows.
The problem you run into is that the utility never sees your printer. It is not explained in the manual that you must go to the printer and first setup the printer to be in firmware update mode. Once it is in this mode, then the utility will see the printer and update it. Again, this is not explained in the manual from what I can tell.
Firewall Recommendation
This is more a tip for anyone who has a network printer like this. You should block the printer from the internet using firewall rules on your router. Block the printer’s network IP completely or block these specific ports for your printer’s IP address:
- Port 631 UDP and TCP
- Port 443 TCP
This will prevent hackers from communicating with your printer and printing all sorts of stupid stuff.
Additional Links
by WebKeyDesign | Dec 28, 2020 | Apple, Mac OS X
 Over the Summer I got a new MacBook Pro 16 to replace my current MacBook Pro from 2010. Due to the COVID19 pandemic, I had to start working from home full time, so my home office has had to go through a lot of changes to accommodate this change. This has meant, that my new MacBook has been sitting in a box for a couple of months while my desk has been taken over by my work laptop. The other hesitation has been Apple; they have been focused on iOS 14 and product launches around it, that MacOS 11, otherwise known as macOS Big Sur was released in the Fall instead of late Summer. Now with macOS Big Sur 11.1 installed, I have been slowly moving over to the new MacBook.
The first real problem I have encountered has been with my Lexmark E260dn monochrome laser printer. Lexmark no longer provides updates for this printer and since the printer still works fine and I use it sparingly throughout the year; I see no reason to replace it. The E260dn replaced a similar Lexmark printer, which died a few years ago, unexpectedly on the day I needed to print some tax documents. I suspect a power surge or electrical short killed the board. Upon downloading the printer drivers for MacOS X from Lexmark, running the installer, and adding the printer in System Preferences – Printers & Scanners, and then attempting to print an email, I got a Filter Error in the Printer Status.
After researching the problem, I was able to to fix the issue.
Reset Printing System
First open up System Preferences – Printers & Scanners. Hold down the Control key and drag your pointer over the Printers area. The option to Reset Printing System will appear. Go ahead and click on the option.
Download Lexmark Drivers
You will need to get the last updated drivers from Lexmark. Here is the direct link to the download page: Print Driver for 10.6.8 and later Mac OS. Once you agree to the download, open the installer and run through the installation process.
Add Lexmark Printer
In System Preferences – Printers & Scanners, click the plus sign and add your printer. It should come up and you should see it added. If you try to print something, it should result in the Filter Error.
Modify Settings
Use the Go to Folder… option under the Go menu to open the following location: /Library/Printers/Lexmark/filter/
Next you will need to edit the file psoptionreroute with a text editor. I recommend using BBEdit, as it will let you modify system files easily. Right Click on the file and choose Open With – Other and choose BBEdit. In the file psoptionreroute, look for the line:
use POSIX qw(tmpnam);
Comment this line out by adding a pound sign in front of it and then directly underneath add the text below:
use File::Temp qw(tmpnam);
File and Save and close the file. At this point, go ahead and attempt to print something and the error will no longer appear and you should hear your printer turning on and spitting out a page or two. Further discussion on this issue can be found on the Apple Support Forums.
by WebKeyDesign | May 18, 2014 | Apple, Mac OS X, Networking, Windows
 Apple has a long history with computer networking, from AppleTalk to today’s Internet connected world. However, it is Windows networking that still causes all kinds of headaches for Mac OS X users. It seems that with every release of Mac OS X, Apple seems to have recurring issues with Windows shares. Some of Apple’s defenders will state that Apple adopts industry standards as is, and it is Microsoft and others who publish specs, but don’t actually follow them, so when Apple does follow the specs, it seems to just end up breaking things. SMB is the networking protocol that Microsoft uses for Windows networking. It is what allows Windows network file shares to work across the network. With the latest versions of Mac OS X, Apple abandoned the open source SAMBA package that most Linux distros use to connect to Windows, and wrote their own SMB2 software. This makes Mac OS X 10.9 Mavericks connect faster and better to Windows servers. Well that is when it works!
SMB Connections Fail
There is one Windows 2012 Essentials server with multiple shares. There are two Macs on the local network. One iMac is connected over Wireless N and one MacBook Pro is using a wired ethernet 1Gb connection. When using the Connect to Server… option the iMac connects fine and has no issues. The MacBook Pro opens the share and then never displays any files, it just spins in the lower left hand corner of the window that opens. Both computers are running Mac OS X 10.9.3 Mavericks.
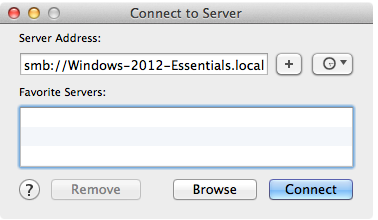
Connecting via CIFS instead of SMB seems to work for the MacBook, but it is slower.
The Solution
The solution ended up modifying the Windows 2012 Essentials server. There are two registry keys that need to be added in order to fix the problem for the MacBook.
Under this Registry Key:
- HKEY_LOCAL_MACHINE\SYSTEM\CurrentControlSet\Services\LanmanServer\Parameters
Add these DWORD values:
- Smb2CreditsMin – make this 768
- Smb2CreditsMax – make this 16384
Once you made the changes restart the Windows Server and then the Macintosh clients. It should now fix the problem.
Microsoft provides the following information on these registry keys:
The defaults are 512 and 8192, respectively. These parameters allow the server to throttle client operation concurrency dynamically within the specified boundaries. Some clients might achieve increased throughput with higher concurrency limits, for example, copying files over high-bandwidth, high-latency links.
by WebKeyDesign | Aug 20, 2012 | Apple, Mac OS X, Safari
 After upgrading to Mac OS X 10.8 Mountain Lion, I started to experience problems with Safari 6 and some HTTPS connections. For example I could no longer log into Amazon or even browse forums who used SSL connections. Ironically, I found a post on Apple’s forums that described some of my symptoms, but since the support forums are HTTPS, I could not use Safari. Luckily Firefox still worked. The problem on Apple’s forum went on about SSL Certificate issues and the solution is described on this blog posting, but this problem was specific to Mac OS X 10.7.4 Lion. There is also a bug that has to do with specifying a proxy in Mountain Lion. This seemed more plausible to me, since I use pfSense with Squid Proxy in transparent mode at home, however this also would not explain why only SSL connections had issues and regular HTTP sites worked fine.
Solution
After much research, it seems the simplest solutions work best. I had to manually specify my MTU setting from 1500 to 1492 in System Preferences – Network – Advanced… – Hardware – MTU. This immediately resolved my Amazon logging in issue.
by WebKeyDesign | Aug 1, 2012 | Apple, Mac OS X, Safari
With the release of Safari 6, the default font settings preferences have been removed. If you still want to set default fonts without using a custom style sheet you can still use Terminal commands to set them. Another workaround is to use the Quickstyle Safari Extension.
Below are some example commands for Terminal:
Proportional Font:
defaults write com.apple.Safari com.apple.Safari.ContentPageGroupIdentifier.WebKit2StandardFontFamily 'Lucida Grande'
defaults write com.apple.Safari com.apple.Safari.ContentPageGroupIdentifier.WebKit2DefaultFontSize 16
Fixed Width Font:
defaults write com.apple.Safari com.apple.Safari.ContentPageGroupIdentifier.WebKit2FixedFontFamily Monaco
defaults write com.apple.Safari com.apple.Safari.ContentPageGroupIdentifier.WebKit2DefaultFixedFontSize 12
by WebKeyDesign | Dec 1, 2008 | Mac OS X
 Recently, I had the opportunity to diagnose a problem with an external Firewire drive and Mac OS X. The drive would no longer mount on the OS X desktop and the only place you could see it (other than Terminal) was in Disk Utility. If you ran Disk Utility – Verify or Repair, the message: invalid content in journal would appear. The fix to make it mountable again was to do the following in Terminal.
The first command gives you a list of all drives and in the right most column, you will need to identify what the Identifier Name is for your volume. Once you have that, run the second command and substitue the IDENTIFIER_NAME with the correct Identifier Name for your volume.
diskutil list
/System/Library/Filesystems/hfs.fs/hfs.util -N /dev/IDENTIFIER_NAME
Example: disk0s2
If it successful, this will mark the disk as no longer Journal, so you can now shutdown the Firewire drive and then unplug it. Wait a minute or so and then start it back up and plug it back into the Macintosh and then you should be able to see the drive mount again.
This allowed me to mount the drive again, but I believe there is still a problem with this drive, so my recommendation was to backyp the drive right away and then reformat it and exchange it for a new drive. I am not sure if the problems with the 1.5TB Seagate drives in RAID configuration apply to other Seagate drives as this one was a 1TB drive, but you never know.

 There is nothing more frustrating about the tech world than having to support printing. Unlike computers, tablets, and mobile phones, the printer seems to be the last reminder that the world is not entirely digital. The printer is in fact a mechanical device that requires attention to detail. It is the one device that I can think of that I use the least but which breaks down just when I need to use it. It will break because I use it too much or not enough! The printer has spinning rollers and ink cartridges and it moves paper, but if the paper is too moist or not enough, or wrinkled, or folded, or too thick then you have a paper jam. What I am trying to say is that your printer is needy, it wants your attention or else.
  Over the Summer I got a new MacBook Pro 16 to replace my current MacBook Pro from 2010. Due to the COVID19 pandemic, I had to start working from home full time, so my home office has had to go through a lot of changes to accommodate this change. This has meant, that my new MacBook has been sitting in a box for a couple of months while my desk has been taken over by my work laptop. The other hesitation has been Apple; they have been focused on iOS 14 and product launches around it, that MacOS 11, otherwise known as macOS Big Sur was released in the Fall instead of late Summer. Now with macOS Big Sur 11.1 installed, I have been slowly moving over to the new MacBook.