by WebKeyDesign | Jul 20, 2026 | Apple, Mac OS X, Microsoft, Networking, Tech Notes, Windows
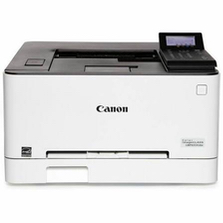 There is nothing more frustrating about the tech world than having to support printing. Unlike computers, tablets, and mobile phones, the printer seems to be the last reminder that the world is not entirely digital. The printer is in fact a mechanical device that requires attention to detail. It is the one device that I can think of that I use the least but which breaks down just when I need to use it. It will break because I use it too much or not enough! The printer has spinning rollers and ink cartridges and it moves paper, but if the paper is too moist or not enough, or wrinkled, or folded, or too thick then you have a paper jam. What I am trying to say is that your printer is needy, it wants your attention or else.
I decided to replace my Lexmark printer, because all it really did at this point is swallow paper and refuse to print. The replacement ended up being a Canon color laser printer that I found on sale on Amazon. This time, I went with a color laser and decided to give Canon a shot at being the home office printer. First you should know that all printer software is terrible. I install printer drivers for Lexmark, HP, Epson, and Brother and it is all equally confusing on Windows and MacOS. The main difference between the Canon and the Lexmark printers is the noise. The Lexmark is rather quiet when it spins up every now and then. The Canon sounds rather loud and you can hear it from another room when it wakes up and prints. I did run into two issues with the Canon. The first issue was that I was unable to update the firmware on the printer, the other was my fault. I forgot what code I setup for the security of the printer and needed to reset it back to factory settings.
Factory Reset
For the reset, you must be at the printer and use a special sequence to put the printer into Service Mode. This is not at all in the manual. For Service Mode:
- Press Home
- Press 2
- Press 8
- Press Home
Now you can do a Factory Reset from the menu options.
Firmware Update
For the Firmware Update, you will need to download it from the Canon Support site or you can update the firmware from one of the options on the printer itself, by going through the menu options. I preferred to download the update from the site, connected a laptop to the printer via USB, and then ran the firmware update tool as administrator in Windows.
The problem you run into is that the utility never sees your printer. It is not explained in the manual that you must go to the printer and first setup the printer to be in firmware update mode. Once it is in this mode, then the utility will see the printer and update it. Again, this is not explained in the manual from what I can tell.
Firewall Recommendation
This is more a tip for anyone who has a network printer like this. You should block the printer from the internet using firewall rules on your router. Block the printer’s network IP completely or block these specific ports for your printer’s IP address:
- Port 631 UDP and TCP
- Port 443 TCP
This will prevent hackers from communicating with your printer and printing all sorts of stupid stuff.
Additional Links
by WebKeyDesign | Mar 13, 2024 | Out Of The Box, Tech Notes
 Since I work from home now, I started to try and make everything in the home office as quiet as possible. I replaced the fluorescent light ballasts with new ones that do not buzz. In fact, when replacing one of the ballasts, I found that it was actually burned out! I swapped out the tubes as well with new LED ones. The next thing was to tackle the tower Windows Server box that sits in the office. I took the case completely apart and installed all new Noctua fans except for the CPU cooler fan. The fan power control for the motherboard was still too noisy, so I used a Noctua fan controller instead to power most of the fans to be slower. This reduced the noise and I was able to work in a quiet office for several months. What eventually cropped up was the power supply started to make some fan noise. This Windows Server runs all the time, so some components can fail over time.
The Power Supply
This is actually the second XFX power supply. The original XFX 850 failed after a couple of years. I sent in for warranty and received a new replacement. In the mean time I purchased this model:
XFX ProSeries P1-1050-BEFX 1050 W ATX12V 2.2 / ESP12V 2.91 SLI Ready CrossFire Ready 80 PLUS GOLD Certified Full Modular Active PFC Power Supply
Now after a few more years with the 1050, it started to whine and make fan noise when the tower would heat up. Trying to get warranty service for slight fan noise, will probably be hard and this power supply is out of warranty at this point. It has been running for 9 years!

WARNING! POWER SUPPLY HAS ELECTRICITY AND CAN HURT YOU!
Do not do this if you do not know what you are doing. It is best to just buy a new power supply if you are not proficient with electronics.
Disassembly
I disconnected the power cord from the power supply, then held the power button for a couple of minutes on the computer to discharge some of the electricity. Next, I disconnected all the computer cables from the power supply and unscrewed it from the tower case. After this, I unscrewed the main screws and carefully opened the power supply. The HA13525H12F-Z fan is partially glued to the case, so I recommend a plastic tool to detach it.
Once I had it opened, I did not detach the fan power line to the supply. After using a can of compressed air to clean off the dust, here is what it looked like:

The power supply and fan were not as dusty as what I thought it would be. Make sure you do not touch the blue capacitors as they may still have a charge. You can google the fan model number HA13525H12F-Z if you want to replace it with a new one. For me, I just want to see if I can keep the original fan after some maintenance. A replacement fan would most likely be $25 or more and so it would be easier to just buy a new power supply.

This is perhaps one of the easiest fans to work with. It literally snaps apart and once you have it disassembled, you can clean the inside with some cotton swabs and a bit of rubbing alcohol. Be careful, as you do not want to break any of the copper coils.
What I noticed is that there really was not much lubricant left, so this can explain the whining sounds. I used some sewing machine oil and a bit of Permatex Anti Seize lubricant. Less is more in this application, because you do not want any oil or lubricant spilling out. Clean up any excess and check it once more, after snapping the fan back together.

Conclusion
After this maintenance, my fan noise is now gone and I hope to get a few more years out of this power supply. Another plus is that I kept more electronic waste from the landfill.
by WebKeyDesign | Feb 16, 2024 | Microsoft, Tech Notes, Windows
 Last weekend, my son returned to me the used HP EliteBook 840 G3 laptop that I had gotten him for college. He no longer was using it and it was buried in his old bedroom under some of his belongings. He did tell me that the laptop no longer started and that it had a low battery screen. Once I had some time, I inspected it and sure enough, the laptop would not even light up the display and so it seemed it was dead. I spent a couple more hours trying to figure out what it was. I opened it up and tried a variety of options, such as removing the internal battery and disconnecting the CMOS battery. Nothing seemed to work. I even connected an external display to see if that would work.
3 Long, 2 Short Beeps No Display
Finally, I removed both memory SODIMMs and found that it was one of the SODIMMs that was bad. The original Samsung memory would cause the computer to startup with the 3 long beeps, followed by 2 short beeps. The second SODIMM was a new Corsair module that I had added when I bought the laptop originally. Apparently the HP BIOS will not display a screen if one of the memory modules is bad. I have only seen memory go bad one other time on a Dell server. However, I assumed that if the memory module was bad, the BIOS would still boot and display an error. HP does not do that.
I ordered a new 8GB SODIMM and a new battery. The original battery would not charge, so that definitely needed to be replaced.
The laptop was on Windows 10, so I decided to wipe it and install Windows 11. Since this is an old laptop, HP no longer supports it and so the HP Support page will not list any updates for Windows 11. However, I the laptop runs Windows 11 fine. There is a Windows Updates issue where it keeps trying to install the Conexant driver.
Additional Notes
For the issue with audio driver Conexant, I had to run the Windows Update Troubleshooter and force that particular update to no longer show up in Windows Update. Audio is working on the laptop, so the installed driver works fine.
The other issue I noticed was that the battery would not charge past 78 percent. For this, I had to go into the HP BIOS, hit F1 and choose to go into the setup. Under the Power Management, you have to choose to allow HP to manage the battery and then it will charge to 100 percent. The default option tries to save battery cycles.
This laptop also had the LCD screen replaced. The screen ended up going bad shortly after I originally bought it. In all this laptop has lasted a lot longer than I expected. I am not fan of the HP BIOS and I know the Dell Latitudes are pretty cheap when bought used, but they tend to run hot. Next time I will probably try to get a Thinkpad.
by WebKeyDesign | May 9, 2016 | Microsoft, Project Management, Tech Notes, WebKeyDesign
 Backups are a necessary routine for computers. Over the years, there has been many trends in computing that promised to make backups easier, simpler, but as humans, we still tend not to do a good job when it comes to backing up our data. The best solution for home users is Time Machine in Mac OS X. Simply add a drive (usually an external drive), and setup Time Machine to backup your entire main drive. Time Machine is the most simple backup to setup, but it is not perfect. After multiple backups, Time Machine usually encounters problems and the easiest solution ends up having to wipe your Time Machine drive and start all over again. On Windows, there are third party apps that allow for Time Machine like backups. Their main benefit is that their user interfaces are easier to use than the built-in Microsoft Backup program. There are also cloud backups as well now, so you can use iCloud, Google, Microsoft, or Dropbox for your backups. For most of us though, the cloud backup should really be a secondary backup and not your primary. In general terms the advice is to have a backup plan and to automate it as much as possible. Eventually all hard drives and flash memory fail in some way, and so backups are always going to be needed.
As a project manager, one backup strategy that I have used for a number of years is to have a one folder backup strategy. For my business laptop, I create one folder under C:\Users\Username\My Documents\. This folder I name Projects and I then create a shortcut for it and place the shortcut on my Desktop. For every project I work on I create a folder underneath the Projects folder. As I complete projects, I then move these folders to \Projects\Archive. Anything related to a project has to be save somewhere under the Projects folder. This takes discipline, but is very easy to do once you keep to this routine of saving files to one folder.

Although every Operating System now provides a directory structure for users, most people have made the Downloads folder their main working folder! How many times has someone asked you to help them find a file, and you have opened their Downloads folder to discover thousands of files? This happens way to often. The Downloads folder was never meant to be a work folder. It was mean to help users find their downloaded files, but over time, people have treated the Downloads folder as their main repository for everything. It is important to remember that the Downloads folder is really a temporary folder for files. Nothing important should ever exist in the Downloads folder. Anything in the Downloads folder can and should be deleted. Move all your important files and working files to your main Projects folder and never work on any files outside of the Projects folder.
Now that you have all your files in one location, you need to copy your Projects folder and anything underneath to a secondary drive, backup location, cloud service. Although at the end of the day, you could simply copy and paste, drag and drop, it is best to automate this. In a business environment, there usually is a network drive or NAS that you can backup important files to. There are multiple apps or commands that you can script to accomplish this. The easiest way I have found is to use SyncBackSE. Using this application, I automate the backup of the Projects folder to run Monday through Friday, while I am at lunch. This backup strategy works well and is uncomplicated to use.
by WebKeyDesign | Jan 4, 2016 | Tech Notes
 A most perplexing problem occurred with my Windows Server computer. This computer was built about 2 years ago and is my primary server for the home network. It has a SuperMicro Workstation Class motherboard with ECC RAM. I built this box, after getting annoyed with inexpensive Dell Tower Servers. The Dell Servers performed well and are a good deal for most people, but my server is in my home office and I prefer a quieter box. The Dell Servers have noisy fans and even trying a few different replacement aftermarket fans, they still produced enough noise for me to invest in a custom system. I also found myself replacing the Dell Servers more often than I cared to. They were cheap enough, that I would end up upgrading the entire box every two years. The server I ended up building was very quiet and ran 24/7. It was connected to an APC UPS and so it ran almost without interruption. At least it did this until rather recently.
After running for two years, the box was completely silent one day. Pressing the power button on the case would do nothing. There were no lights or any other signs of life (in this case electricity). I unplugged the computer from the UPS and into the wall outlet directly. Pressing the power button on the case would make the case fan and cpu cooler fan spin for about a second or two. The motherboard would never light up. It would only do this once. I had to unplug the power cord and try it again to get the fans to spin. I then unplugged the power supply connectors from the mother board and then tried the paper clip test with the power supply and it would power the fans again for a couple of seconds.
Alas, I could not resurrect the computer. My next step was to order a new power supply from Newegg.com and hope that it was my fancy power supply and not my fancy workstation motherboard that died. The new 1050W power supply was an upgrade from the 850W it was replacing. Other than the wattage difference, the new power supply had a switch to cycle on and off the power supply fan as needed. Once I swapped out the power supply, the box came back to life. The good thing about buying good components is that they are warrantied. I submitted an RMA request through the manufacturer website and a few days later, it was approved. After a week or so, they sent me back another power supply. I expected them to send me back a repaired unit, but instead they sent me back a brand new sealed box!
Before I sent my power supply, I inspected it without opening it. The only thing I detected was that on the top of the unit, there was a sharp indentation, where it seemed as something pushed up against metal from inside. I am pretty sure that was not there when I installed it originally. Other than that the unit looked normal.
The Windows Server has been running now normally for weeks.
by WebKeyDesign | May 7, 2014 | cPanel, Networking, Tech Notes
 In this post, I discuss how to setup your own domain with Zoho Mail, a hosted email solution from Zoho. Similar to Google Apps, Zoho provides a set of online business tools including office apps, project management, and contact management. At the time of this post the hosted email package has a free option as well as higher tiers for users who need more options. The biggest selling point for Zoho is that none of their apps have advertisements, and so if you are bothered by other webmail solutions that feature ads, Zoho seems to be a good alternative solution. Other than webmail access, the other reasons to use Zoho is that it works with desktop email clients, smartphones, and tablets.
My Requirements For An Email Solution
In order of importance, here is what I was looking for in an email solution.
Integrates with your Domain name
- I wanted an email solution that would work with my current personal domain that my family uses.
iPhone and iPad Support
- Everyone in the family has an iPhone, iPod, or iPad that they can use for email.
Apple Mail Support
- Oh, we do use our Mac computers every now and then, so we need desktop mail.
IMAP
- I want to keep email on the server, and not worry about losing it. I can also manage my email from my smartphone when I have time. This is really convenient.
Cost
- Free if possible, but am willing to pay for a good solution on a yearly basis.
Ad-free
- Not having my kids bombarded with advertisements is a good thing.
Zoho’s Instructions
Step 1: Verify domain ownership
Please verify your domain ownership. This is required to prevent imposters from using domains to send malicious messages. You can follow either the CNAME method or HTML method for verification.
Step 2: Add / import users to your organization
As the administrator of your organization, you have a Control Panel link in your user interface. In the Control panel, click User Details on the left list of options and click Add User option on the top. You can also import a list of users by selecting the Import User option.
Step 3: Migrating data to Zoho Mail
We recommend you to test migration for 2 users before pointing MX records.
Step 4: Point MX records to Zoho
Point the Mail Exchanger (MX) records to Zoho to start receiving mails to your inbox.
Changing My eMail
Steps 1 and 2 were pretty easy. Since I only have 4 users accounts, it took a few minutes to setup my four users in the Control panel. I skipped Step 3, I don’t really keep a lot of personal email. My current email was stored in Apple Mail and I was fine leaving it there. The interesting step is number 4. The Internet works via DNS. The domain naming system allows everyone and everything to find each other on the network. This is accomplished by DNS having different types of records to point requests to the right place. In the case of most personal domains, you have two different parties involved. The first is a domain registrar who takes care of your domain registration. The second is your hosting provider, usually for shared hosting this is a cPanel type hosting provider. When someone tries to email you at user@some_domain_name.net, a lookup is made to the root DNS authority for the .net domains, your registrar is what adds your domain to the DNS authority servers. The root server then sends you to your nameservers specified. Your nameservers are at your cPanel hosting provider. The final step in the lookup is to see what your cPanel nameserver has for what is called the MX records. The MX records have the server that processes your email and ideally where the email is going to go.
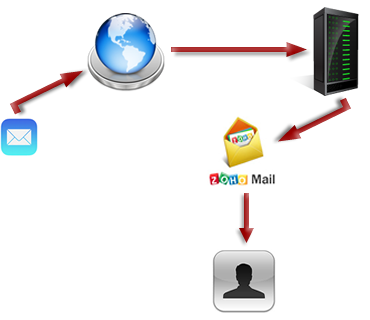
Your current hosting provider has MX records for its own email processing. What needs to be done, is to remove the current MX records and replace them with MX records that point to Zoho’s servers. This way only your email, emails sent to user@some_domain_name.net, will route to Zoho, but everything else will still be at your current hosting provider. To do this most cPanel hosts make it easy to do this now. Log into your cPanel control panel and scroll down to the Email section. You want to click open the MX Entry icon.
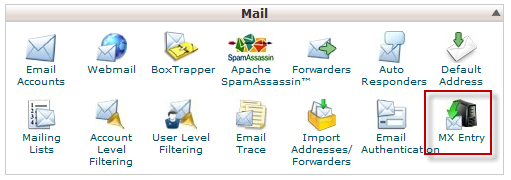
You will first choose your domain name that you want to change the MX records for. This is your main domain. First add the MX entries as Zoho instructs, then remove your current record for your host. When the changes are complete, it should look similar to this:

The DNS changes take a matter of minutes to a couple of hours to propagate to the rest of the internet.

 There is nothing more frustrating about the tech world than having to support printing. Unlike computers, tablets, and mobile phones, the printer seems to be the last reminder that the world is not entirely digital. The printer is in fact a mechanical device that requires attention to detail. It is the one device that I can think of that I use the least but which breaks down just when I need to use it. It will break because I use it too much or not enough! The printer has spinning rollers and ink cartridges and it moves paper, but if the paper is too moist or not enough, or wrinkled, or folded, or too thick then you have a paper jam. What I am trying to say is that your printer is needy, it wants your attention or else.
  Since I work from home now, I started to try and make everything in the home office as quiet as possible. I replaced the fluorescent light ballasts with new ones that do not buzz. In fact, when replacing one of the ballasts, I found that it was actually burned out! I swapped out the tubes as well with new LED ones. The next thing was to tackle the tower Windows Server box that sits in the office. I took the case completely apart and installed all new Noctua fans except for the CPU cooler fan. The fan power control for the motherboard was still too noisy, so I used a Noctua fan controller instead to power most of the fans to be slower. This reduced the noise and I was able to work in a quiet office for several months. What eventually cropped up was the power supply started to make some fan noise. This Windows Server runs all the time, so some components can fail over time.


 Last weekend, my son returned to me the used HP EliteBook 840 G3 laptop that I had gotten him for college. He no longer was using it and it was buried in his old bedroom under some of his belongings. He did tell me that the laptop no longer started and that it had a low battery screen. Once I had some time, I inspected it and sure enough, the laptop would not even light up the display and so it seemed it was dead. I spent a couple more hours trying to figure out what it was. I opened it up and tried a variety of options, such as removing the internal battery and disconnecting the CMOS battery. Nothing seemed to work. I even connected an external display to see if that would work.