Upgrade Linksys Wireless
 This week, I set out to improve my wireless reception for my home network. The wireless local area network (WLAN) is powered by a Linksys WRT54GS router. This is a pretty standard wireless G router. The WRT54G router series are pretty affordable and if you have an older version of the WRT54G or WRT54GS model, you can even install a third party firmware to enable more features. If you are thinking of getting a new router, then I suggest you purchase the WRT54GL, since this is the only model that makes it easy to install third party firmware.
As always, installing a third party firmware on your Linksys router does void your warranty and Linksys will not support your router if you are running third party firmware. Do not attempt this if you do not want to void your warranty and support!
HyperWRT
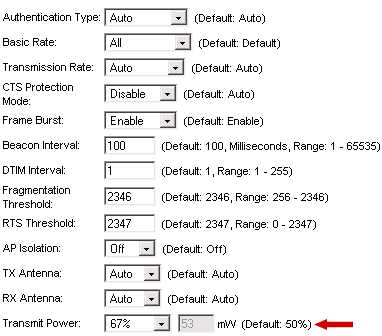
Although there are a variety of different third party firmwares, I chose HyperWRT because it features a powerboosting feature and at the same time strives to stay as close as possible to the original Linksys firmware. Once installed HyperWRT looks almost identical to the Linksys interface. The main difference is the Transmit Power option found under Advanced Wireless Settings:

This will effectively boost the range and power of your WLAN. It is best to not boost the signal all the way to 100%, as this will make the router run hotter than normal.
TNC Antennas
Besides firmware changes the other way to boost wireless range is by using a better antenna. The WRT54G routers have TNC connectors to which the antennas connect to. You can purchase a third party antenna from sites like HyperLink Technologies, like this huge Hyper Gain 2.4 GHz 9 dBi Rubber Duck.
 If you prefer to have the antennas match your router, then you want the Linksys HGA7T antennas. These replacement antennas are exactly twice as long as the original antennas on the WRT54G router and are rated at 7dBi.
Replacing the original antennas will increase the wireless range and signal strength, depending on your location from the router. These antennas work best when you are located horizontally to the router. If your main objective is to get better wireless reception on a floor directly above from the router, you are better off installing another access point router. In my experience, the HGA7T antennas improved wireless signal by 12% when I setup my laptop one floor above the router. Overall the improvement was not overwhelmingly better, but was an improvement. Like I said these antennas work best when you and the router are on the same floor. I did experience less signal drops though and was able to use my laptop in my upstairs living room where I had been having problems staying connected before.
As for installing the new TNC antennas, all you have to do is squeeze and turn counterclockwise the antenna to remove it. If you are having trouble getting one off, squeeze tighter and pull the plastic bushing (cover) away from the router to get to the actual antenna TNC connector. Once you remove both, slide the original bushings on to the new antennas and connect them. The router will look a bit stranger with the new larger antennas, but hey looks are not what we are after, it’s a better wireless signal that we want.
Corrections:
The original HyperWRT site may no longer be up. You can still find a copy of HyperWRT Thibor, which is the last version of HyperWRT to be worked on: Thibor’s HyperWRT.
