by WebKeyDesign | May 18, 2014 | Apple, Mac OS X, Networking, Windows
 Apple has a long history with computer networking, from AppleTalk to today’s Internet connected world. However, it is Windows networking that still causes all kinds of headaches for Mac OS X users. It seems that with every release of Mac OS X, Apple seems to have recurring issues with Windows shares. Some of Apple’s defenders will state that Apple adopts industry standards as is, and it is Microsoft and others who publish specs, but don’t actually follow them, so when Apple does follow the specs, it seems to just end up breaking things. SMB is the networking protocol that Microsoft uses for Windows networking. It is what allows Windows network file shares to work across the network. With the latest versions of Mac OS X, Apple abandoned the open source SAMBA package that most Linux distros use to connect to Windows, and wrote their own SMB2 software. This makes Mac OS X 10.9 Mavericks connect faster and better to Windows servers. Well that is when it works!
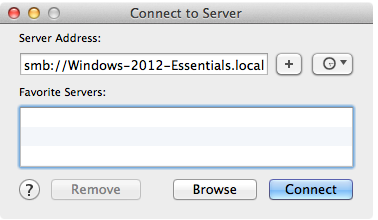
SMB Connections Fail
There is one Windows 2012 Essentials server with multiple shares. There are two Macs on the local network. One iMac is connected over Wireless N and one MacBook Pro is using a wired ethernet 1Gb connection. When using the Connect to Server… option the iMac connects fine and has no issues. The MacBook Pro opens the share and then never displays any files, it just spins in the lower left hand corner of the window that opens. Both computers are running Mac OS X 10.9.3 Mavericks.
Connecting via CIFS instead of SMB seems to work for the MacBook, but it is slower.
The Solution
The solution ended up modifying the Windows 2012 Essentials server. There are two registry keys that need to be added in order to fix the problem for the MacBook.
Under this Registry Key:
- HKEY_LOCAL_MACHINE\SYSTEM\CurrentControlSet\Services\LanmanServer\Parameters
Add these DWORD values:
- Smb2CreditsMin – make this 768
- Smb2CreditsMax – make this 16384
Once you made the changes restart the Windows Server and then the Macintosh clients. It should now fix the problem.
Microsoft provides the following information on these registry keys:
The defaults are 512 and 8192, respectively. These parameters allow the server to throttle client operation concurrency dynamically within the specified boundaries. Some clients might achieve increased throughput with higher concurrency limits, for example, copying files over high-bandwidth, high-latency links.
by WebKeyDesign | May 9, 2014 | Linux, Networking, Software
 SARG Reports are a good compliment to Squid Proxy and since there is a package that is available for installation in pfsense, it makes good sense to setup SARG Reports. The downsides to SARG Reports is that the reports do take up space and over time this can be significant. This posting is about a problem I encountered on pfsense 2.1 and the latest SARG package.
For some unknown reason the reports stopped generating. Upon checking my System Log this is the issue I found:
php: /pkg_edit.php: The command 'export LC_ALL=C && /usr/pbi/sarg-amd64/bin/sarg -d `date +%d/%m/%Y`-`date +%d/%m/%Y`' returned exit code '1',
the output was 'SARG: Cannot get the modification time of input log file /var/log/squid/access.log (No such file or directory). Processing it anyway SARG: File not found: /var/log/squid/access.log'
I am using the 64-bit version of pfsense, so hence the sarg-amd64. If you are using 32-bit, it will state instead sarg-i386.
The solution is to edit the sarg.conf file that is located in one of these locations, depending on your pfsense build:
/usr/pbi/sarg-amd64/etc/sarg/sarg.conf
/usr/pbi/sarg-i386/etc/sarg/sarg.conf
You will need to verify that the access_log line is correct:
#access_log /usr/local/squid/var/logs/access.log
In my case, removing the # sign and specifying the correct path to my Squid access.log corrected the problem.
If you have issues with SARG Reports, it is best to do the following:
- Under the Status Menu – click SARG Reports.
- On the General tab click Save
- Next click on the Users tab and click Save
- Click Schedule and create your schedule or if you have one already open it up and click Save.
- You can go back to the Schedule and Force Update to see if SARG Reports are working now.
I also schedule SARG Reports in Cron to run at 11:50pm every night instead of midnight.
50 23 */1 * *
by WebKeyDesign | May 7, 2014 | cPanel, Networking, Tech Notes
 In this post, I discuss how to setup your own domain with Zoho Mail, a hosted email solution from Zoho. Similar to Google Apps, Zoho provides a set of online business tools including office apps, project management, and contact management. At the time of this post the hosted email package has a free option as well as higher tiers for users who need more options. The biggest selling point for Zoho is that none of their apps have advertisements, and so if you are bothered by other webmail solutions that feature ads, Zoho seems to be a good alternative solution. Other than webmail access, the other reasons to use Zoho is that it works with desktop email clients, smartphones, and tablets.
My Requirements For An Email Solution
In order of importance, here is what I was looking for in an email solution.
Integrates with your Domain name
- I wanted an email solution that would work with my current personal domain that my family uses.
iPhone and iPad Support
- Everyone in the family has an iPhone, iPod, or iPad that they can use for email.
Apple Mail Support
- Oh, we do use our Mac computers every now and then, so we need desktop mail.
IMAP
- I want to keep email on the server, and not worry about losing it. I can also manage my email from my smartphone when I have time. This is really convenient.
Cost
- Free if possible, but am willing to pay for a good solution on a yearly basis.
Ad-free
- Not having my kids bombarded with advertisements is a good thing.
Zoho’s Instructions
Step 1: Verify domain ownership
Please verify your domain ownership. This is required to prevent imposters from using domains to send malicious messages. You can follow either the CNAME method or HTML method for verification.
Step 2: Add / import users to your organization
As the administrator of your organization, you have a Control Panel link in your user interface. In the Control panel, click User Details on the left list of options and click Add User option on the top. You can also import a list of users by selecting the Import User option.
Step 3: Migrating data to Zoho Mail
We recommend you to test migration for 2 users before pointing MX records.
Step 4: Point MX records to Zoho
Point the Mail Exchanger (MX) records to Zoho to start receiving mails to your inbox.
Changing My eMail
Steps 1 and 2 were pretty easy. Since I only have 4 users accounts, it took a few minutes to setup my four users in the Control panel. I skipped Step 3, I don’t really keep a lot of personal email. My current email was stored in Apple Mail and I was fine leaving it there. The interesting step is number 4. The Internet works via DNS. The domain naming system allows everyone and everything to find each other on the network. This is accomplished by DNS having different types of records to point requests to the right place. In the case of most personal domains, you have two different parties involved. The first is a domain registrar who takes care of your domain registration. The second is your hosting provider, usually for shared hosting this is a cPanel type hosting provider. When someone tries to email you at user@some_domain_name.net, a lookup is made to the root DNS authority for the .net domains, your registrar is what adds your domain to the DNS authority servers. The root server then sends you to your nameservers specified. Your nameservers are at your cPanel hosting provider. The final step in the lookup is to see what your cPanel nameserver has for what is called the MX records. The MX records have the server that processes your email and ideally where the email is going to go.
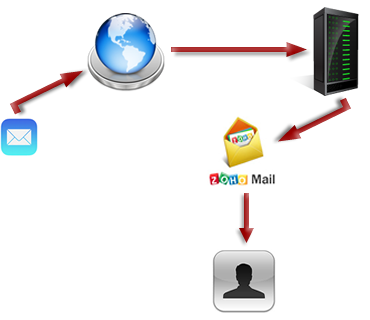
Your current hosting provider has MX records for its own email processing. What needs to be done, is to remove the current MX records and replace them with MX records that point to Zoho’s servers. This way only your email, emails sent to user@some_domain_name.net, will route to Zoho, but everything else will still be at your current hosting provider. To do this most cPanel hosts make it easy to do this now. Log into your cPanel control panel and scroll down to the Email section. You want to click open the MX Entry icon.

You will first choose your domain name that you want to change the MX records for. This is your main domain. First add the MX entries as Zoho instructs, then remove your current record for your host. When the changes are complete, it should look similar to this:

The DNS changes take a matter of minutes to a couple of hours to propagate to the rest of the internet.